Sunprints

Sunprints
Sunprints I made in the summer at the family cottage

Wednesday, 30 May 2018

Rusting and Bleaching workshop with Gunnel Hag

I went to Toronto a few weeks ago and went to a workshop with Gunnel Hag at her studio.  I really enjoyed the workshop.   She showed us how to rust and bleach fabrics.  The rusting I had done before but the bleaching was kind of new for me.   I'm so used to adding colour to white fabric but in this case we were subtracting colour.   We used dark fabrics.  When you bleach them you reveal the colours underneath.  I used black and dark blue cotton and fabrics to bleach.  Under the dark blue there was a pinkish colour and under my black fabric there was a peachy colour.  I would like to try using dark green and other darker fabrics too.

This is a dark blue fabric that I folded up into a square and put a circle resist (mason jar lid) on both sides with a clamp and then dipped in the bleach solution.  Next time I want to make it an even quicker dip to have more circle showing afterwards.


Here's a close up of one of the circles.  You can see the imprint of the lid.


For the fabric below, I sprayed the bleach solution onto my fabric after laying some leaves and grasses on it.


On this black fabric I stamped a thickened bleach solution.  I used light pressure so that they wouldn't be perfect squares.


On the fabric below I used a synthetic paint brush and brushed on the bleach solution.

 
For this dark blue fabric I wound it around a bottle and wound string around it.  Then I dipped it in the bleach solution.


I used the same winding string method on this black t-shirt.  I used a larger cylinder to do it this time.


Here's the back of the t-shirt.  The patterns on the back are neat too.


Here's one of the rusted fabrics I made.  It started out as a piece of light blue silk curtain material.  The rust turned it grey.  Thanks for having a look!


Tuesday, 8 May 2018

Recent projects

Recently I did a bit of printing with a piece of styrofoam that I found in some packaging material at work.  It looks like a hockey puck but it's made up of two rings and a centre which interlock. Below is some printing in which I separated the parts to print different colours in a circle.


This is a close up of a print.  You can see it's kind of fuzzy because of the styrofoam.


Here I used part of the styrofoam stamp to make the centre of these blue flowers.  Then I added petals around the centre. The petal stamp was carved from an eraser.  The background fabric was something I made earlier with pole wrapping.


Here's a close up below of the flowers.  I like the way the background shows a little through the petals. I'm still deciding whether to make stems or not.


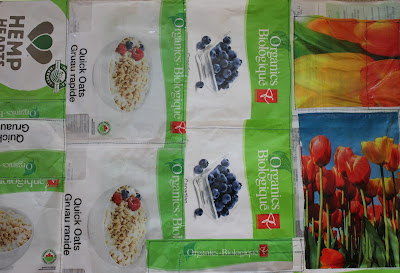
 And on a completely different note, I sewed together some plastic food packaging into a large rectangle on the weekend.  I'm not sure yet what I'll make with it.  But at least I could make a shopping bag with it.  Thanks for having a look!