Sunprints

Sunprints
Sunprints I made in the summer at the family cottage

Tuesday, 4 December 2018

Stittsville Library show

So we hung up the Stittsville  Library display on the weekend and it looks very good!  The theme this year is "Favourite Quote".  The show will be hanging up until December 31st.  Some of the items are for sale and have prices on them.   Below is an overview of the pieces on the walls.


Here's a closer look at one side.


Here's the other side. ( My piece is on the top right hand side).


Here are some photos of the display case:


Thanks for having a look!  If you can, do drop by during the month of December.  It will be up until the 31st.

Thursday, 29 November 2018

Piece for Stittsville Library show

I'm organizing the Stittsville library show again this year for Out-of-the-Box.  Our group has a display at the library every year for a month.  We're hanging it up on December 1st.  The show will be there until December 31st.  I've finished my own piece for the show.  The theme was "Favourite Quote".   My quote is "If you truly love nature, you will find beauty everywhere"  by Vincent Van Gogh.  Here's a photo of my finished piece.  It measures 20-1/4 inches by 22 1/2 inches.  The eco print in the centre is one I made in the summer (see two posts ago).  I took a piece of rusted white cotton and eco printed it with sumac branches.  You can see I included wild grapes in the print.  The gold fabric in the borders is cotton that I dyed with onion skins.  Photos of the show hanging up to follow!


Sunday, 4 November 2018

Sun printed tote bag

I've been wanting to post something but work and life has gotten in the way:)  Here's a tote bag I made with some of my sun printed fabric.  There's a pocket inside it and the bag is about 12 inches square (30 cm X 30 cm).  I used fusible stabilizer to create stability.  This one will be a gift for someone but I'm thinking of making more.  Thanks for having a look!


Sunday, 16 September 2018

Eco printing on fabric in August

I had some time at the family cottage again at the end of August and did some eco printing.  Here are some photos taken of my process.  This post shows some printing on rusted cotton and a silk scarf which I had  pre dyed in natural indigo.

Here you can see I put some plant materials on a rusted piece of white cotton.  I used red onion skins, sumac branches, wild grapes and rose leaves from my bush at home on this one.


Here are my plant materials spread on a silk scarf I had pre dyed in natural indigo.  I used wild grapes, sumac branches and wild raspberry branches on this one. Looks promising doesn't it?!


Here are the fabrics wound around rods and put in the steamer.  I learned last year that it's better to protect your rod with a layer of cling film as well as put a layer of cling film on top of the plant materials so that when you wind up the bundle the colour doesn't bleed through to other layers.


Here's the cotton fabric on the washline afterwards.  I particularly like this one.  You can see the blue from the wild grapes and because one sumac branch faced up and the other faced down, the prints are different.  The fabric was folded in half, giving a double print of each.


Here's the silk scarf afterwards on the washline.  The indigo faded quite a bit but you can see the purple from the wild grapes (in the presence of vinegar) and the leaf prints.


Here's a closer look at the scarf afterwards.  I'm going to try eco printing first and dipping in indigo second and see how that works out as well.  Thanks for having a look today!


Tuesday, 21 August 2018

Natural Indigo Dyeing

This summer I wanted to learn to dye with natural indigo.  Michel Garcia is an expert at natural indigo dyeing so I learned his method called the 1-2-3 method.  You use one part indigo powder, two parts lime and three parts antioxidant.  In my case I used fructose as an antioxidant.  I did a lot of reading and I watched videos online to learn how to make the vat.  It's a bit tricky.  You have to get the ph right and the temperature right.  Anyways I finally made a vat a few days ago.  I wore a dust mask to mix the ingredients.   I made it in a large jar so I could see if the colour was right.  At first it didn't seem to be separating and changing colour.  I then put the jar in a bowl of hot water.  It warmed up to 50 C and then it worked.  I saw the layers separating and the top liquid looking green/brown.  Here's the jar with my indigo mixture in it.


Here's a close up of the "flower" in the top of the vat.


I decided to transfer everything into an asparagus steamer pan I bought specifically for this.  It has a steamer basket that you can put inside the pan.  That way you can keep fabric from touching the bottom where there might be sediment.


Here are some fabrics after I pulled them out of the vat.  They look bright green at first, then quickly get darker green and finally turn blue as they oxygenate.


Here are some of the fabrics on the washline afterwards. I washed them in hot water and rinsed them out. The two on the left started out light yellow that's why they look greenish. The one on the right started out white so the colour is all indigo.


And a few more...  It's fun to tie the fabric and bind it to get designs.  I want to experiment more with this.  Thanks for having a look!


Monday, 30 July 2018

Results

Okay, so last time I posted, I mentioned that I was eco printing two silk scarves by steaming them on the deck in ziploc bags because the weather has been so hot.   I made bundles with the scarves soaked in alum overnight and the plant materials on top were sumac petals, coreopsis flowers and some rose leaves from my garden.  After a few days on the deck I opened the bundles and they came out showing lots of red and pink from the sumac, some yellow from the coreopsis and really nothing showing from the leaves.

So after a few days I took one of the scarves and after rinsing it out dipped it in white vinegar.  Then I put leaves onto it again this time dipped in iron water.  I put it on the deck again for a hot day.  I saw that it was getting very dark and the reds and pinks were being overtaken by the dark colour.  But I decided to open it after just that day.  If I had left it longer I think I would have had leaf prints but the entire scarf would have been very dark and I didn't want to lose the red colour of the sumac petals.  The lesson I learned is that you shouldn't put tannin rich things with iron and vinegar if you don't want to have only very dark (black) colours.  The onion skins worked well because they don't contain a lot of tannins and so retain their colour when there is vinegar and iron.

Below is a photo of the second stage where I'm putting leaves dipped in iron water on top of the sumac dyed silk scarf.  You can see a little coreopsis yellow in there too.


Here are the two scarves below.  I like them although I would have liked to have some leaf prints too.  As you can see the iron "saddens" the colours in the second one.  I'm enjoying the process and learning a lot.  Thanks for stopping by!


Friday, 20 July 2018

Adventures in Eco Printing

We've been having very hot weather lately which is great but it's been too hot really to steam plants for two hours in the kitchen.  And I don't really want to bring my little two element burner outside and do it there either because I would be in the hot sun.  So I decided to put some silk scarves on rods (make bundles) and put them in ziploc bags.  Then I put them on my deck in the afternoon.   I figured that the deck is hot enough to steam my bundles.  I went out and turned them over once in a while.   Below is a photo of my plant material on top of the silk scarf.  You can see I put a layer of cling film on top to keep the colours from bleeding through when they're rolled onto the rod.

Here's my set up on my kitchen table.


And here are my bundles on the deck.  You can see the steam inside the bags.


So after a week or so I opened them up with great excitement.  Here is the plant material all stuck to the cling film which made it easier to clean up.  I did decide though to pick it all off so I could put it in recycling. 

I unrolled the bundles and hung them to dry.  I left the scarves for a few days to cure the colours.  Today I washed them out and here is one of them all dry and ironed below.  I'm really pleased with how it worked out.  The colours are very strong.  I would say it worked out as well as with the steaming pot.  I just need to fine tune my layouts a little but I really like the results.


And here's the other one below.  I think I could have opened them sooner than a week.  We had hot weather (around 30 C) pretty much every single day.  Red onion skins certainly work very well.


I now have a few more silk scarves rolled into bundles on the deck which have different plant materials and done with alum instead of vinegar.  I'm looking forward to seeing the results again.  Stay tuned!

Friday, 13 July 2018

Week at cottage

We had a week of vacation last week and I made a few things at the family cottage.  The weather has been very hot which has made it a little difficult to be outside.  I dyed some silk scarves with Colorhue dyes.  I ordered these from G&S dye and thought I would try them out.  They're instant set meaning that as soon as you put the colours on they stay where they are.  Even trying to brush another colour near it the colours won't really mix which is surprising.  Once the fabric is dry the colours are set.  Here are a few silk scarves drying on the wash line.  I did some folding and shibori techniques on silk crepe scarves.


I also did a bit of sunprinting.  I tried making a more patterned background on this one.  I usually just brush on some colour and then put on the plants.  This time I printed on some colour with a sponge and then put on the plant.  I did add some salt at the bottom.


I also did a flour paste piece.  Although I had done some before, this is one of the techniques that I learned more about in a workshop with Gunnel Hag last September in Ottawa.  It takes a little more work.  I made a paste with white flour and water and put it on a piece of white cotton fabric.  After it dried I scrunched it up to create cracks.  I painted on some fabric paint.  I let it dry.  Then I scrunched it again and added another colour.  I did this a few times.  It all takes time to dry.   The sun was luckily hot enough to set the colour.  Then after leaving it overnight I finally soaked it in warm water and washed out the flour paste.  Below is the fabric with flour paste and paint on it.


And here is the finished piece hanging on the line.  The crackling was quite successful.


Here's a close up of the crackling below.  Thanks for stopping by!


Friday, 22 June 2018

cactus flowers

My friend Pat gave me a bunch of frozen cactus blossoms to experiment with.  She has an Orchid Cactus.  I covered the flowers in white vinegar in a jar and left them overnight.  I then heated the flowers vinegar mixture to a boil and took it from the stove.  After steeping awhile I removed the flowers and put in some yarns (they're mostly wool).  I'm very pleased with the results!  Who would have thought the colour would be so strong.  There were quite a few flowers.  I didn't use any mordant and rinsed them out thoroughly afterwards.  I want to use the dye mixture with something else.  Let me know if you're experimenting with natural colours by commenting below.


Wednesday, 6 June 2018

Dyeing yarn with natural materials

A few months ago a friend gave me some white wool yarn to dye naturally.  I wanted to use dye materials easily found at a grocery store.  I've finally gotten around to it and here are the before and after pictures.  I started out with white woolen yarn, some with a bit of nylon in it or other fibre.


So far I've used turmeric powder, frozen wild blueberries and dried hibiscus flowers to colour the yarn.  The green was made with a mix of turmeric powder and blueberries and the orange/brown was made with a mix of turmeric and hibiscus.  I used alum to fix the colours.


I still have a bit of white yarn left and I'm deciding what to try next.  Apparently avocadoes skins and pits make a nice pale peach/pink colour. And black beans make a nice blue colour but I already have blue. Hmm we'll have to see.  I'm hoping my friend will knit something with it.  Thanks for stopping by!

Wednesday, 30 May 2018

Rusting and Bleaching workshop with Gunnel Hag

I went to Toronto a few weeks ago and went to a workshop with Gunnel Hag at her studio.  I really enjoyed the workshop.   She showed us how to rust and bleach fabrics.  The rusting I had done before but the bleaching was kind of new for me.   I'm so used to adding colour to white fabric but in this case we were subtracting colour.   We used dark fabrics.  When you bleach them you reveal the colours underneath.  I used black and dark blue cotton and fabrics to bleach.  Under the dark blue there was a pinkish colour and under my black fabric there was a peachy colour.  I would like to try using dark green and other darker fabrics too.

This is a dark blue fabric that I folded up into a square and put a circle resist (mason jar lid) on both sides with a clamp and then dipped in the bleach solution.  Next time I want to make it an even quicker dip to have more circle showing afterwards.


Here's a close up of one of the circles.  You can see the imprint of the lid.


For the fabric below, I sprayed the bleach solution onto my fabric after laying some leaves and grasses on it.


On this black fabric I stamped a thickened bleach solution.  I used light pressure so that they wouldn't be perfect squares.


On the fabric below I used a synthetic paint brush and brushed on the bleach solution.

 
For this dark blue fabric I wound it around a bottle and wound string around it.  Then I dipped it in the bleach solution.


I used the same winding string method on this black t-shirt.  I used a larger cylinder to do it this time.


Here's the back of the t-shirt.  The patterns on the back are neat too.


Here's one of the rusted fabrics I made.  It started out as a piece of light blue silk curtain material.  The rust turned it grey.  Thanks for having a look!


Tuesday, 8 May 2018

Recent projects

Recently I did a bit of printing with a piece of styrofoam that I found in some packaging material at work.  It looks like a hockey puck but it's made up of two rings and a centre which interlock. Below is some printing in which I separated the parts to print different colours in a circle.


This is a close up of a print.  You can see it's kind of fuzzy because of the styrofoam.


Here I used part of the styrofoam stamp to make the centre of these blue flowers.  Then I added petals around the centre. The petal stamp was carved from an eraser.  The background fabric was something I made earlier with pole wrapping.


Here's a close up below of the flowers.  I like the way the background shows a little through the petals. I'm still deciding whether to make stems or not.


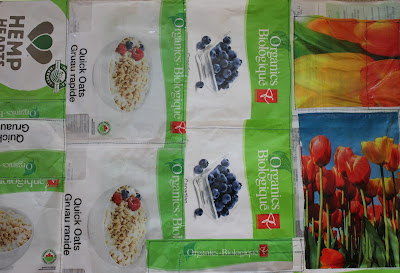
 And on a completely different note, I sewed together some plastic food packaging into a large rectangle on the weekend.  I'm not sure yet what I'll make with it.  But at least I could make a shopping bag with it.  Thanks for having a look!